LXC is a userspace interface for the Linux kernel containment features. Through a powerful API and simple tools, it lets users easily create and manage system or application containers.
The main usage of LXC in my scenario is, to test out any application in linux before deploying to the real environment, without disturbing my host linux. I used to use virtualbox, but LXC is lighter in terms of resources usage, but only applicable to linux.
To install lxc in an ubuntu machine:
$ sudo apt update && sudo apt install lxc -y
Once installed, you now have access to multiple lxc-* commands.
If our ufw firewall is turned on, we need to allow traffic to and from the bridge, and also allow traffic forwarded to the bridge. The name of the bridge is usually lxcbr0
$ sudo ufw allow in on lxcbr0
$ sudo ufw route allow in on lxcbr0
$ sudo ufw route allow out on lxcbr0
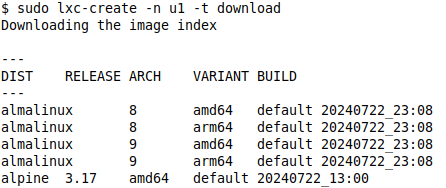
To create a container, use lxc-create command. For example, to create a container named as u1, using a template from https://images.linuxcontainers.org/, in an interactive mode (where you get to select distribution, release and architecture interactively), use below command
$ sudo lxc-create -n u1 -t download
To create a same almalinux container, named u2, using a template from https://images.linuxcontainers.org/ but in a non interactive mode, use below command
$ sudo lxc-create -n u2 -t download -- -d almalinux -r 8 -a amd64
To list out all created containers, use below command
$ sudo lxc-ls
To get a better listing, use fancy mode (-f)
$ sudo lxc-ls -f
To start the containers, just use lxc-start
$ sudo lxc-start u1
$ sudo lxc-start u2
After a while, the containers will get ip addresses
To access the shell of the containers, we use lxc-attach
$ sudo lxc-attach u1
To exit the shell, just type exit
To destroy the containers, we need to stop the container first.
$ sudo lxc-stop u1
$ sudo lxc-destroy u1